Affinity Designer: Crop Image in a Circle Shape
In this tutorial, we will learn how to crop an image into a circle.
1) Launch Affinity Designer
2) Click File > Open... and open the image you want to crop (you can also press ⌘ + O)

3) Pick the Ellipse Tool.
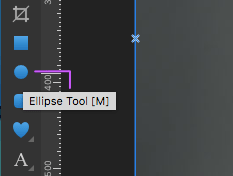
4) Trace out an ellipse selection on the image. For a perfect circle, press SHIFT while tracing.

5) In the Color panel, adjust the Opacity slider to get a clearer view of your selected portion.

6) Use the Move Tool to move, resize and rotate the selection.

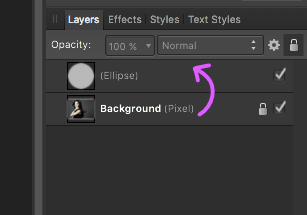
7) After you are done with the selection, go to the Layers panel and drag/merge the image into/with the Ellipse layer above it.
8) You get your desired circular cropped image now. You can copy & paste it in any document/image you want; you can use the Move Tool again to resize, rotate and move.

9) To save it with a transparent background, click File > Export and bring up the dialog box. By default, the PNG tab will be open. Export it as a PNG.

A video tutorial is also created compiling all of the above listed steps and uploaded into our Youtube channel. You can check it out below:
Notes
- The image used here is that of actress Vicki Zhao Wei. I was once a big fan of her 😉