Affinity Designer: Creating an Image Sprite
A CSS sprite is an optimization-technique of wrapping several images into a single image, thereby conserving bandwidth and preventing network congestion caused by unnecessary multiple HTTP requests for each individual image. An image sprite is also known as a sprite sheet or tile sheet.
In this tutorial, we will learn how to create a CSS sprite sheet in Serif's Affinity Designer.
1) Launch Affinity Designer. Select File > New.
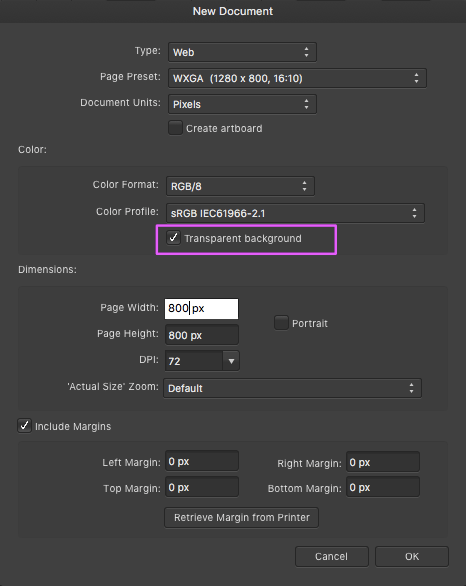
2) A dialog box pops up. We will work in a transparent document, so check Transparent background in the Color section.

3) Open, copy and place all your icons randomly on the transparent background layer. For the purpose of illustation here, we will choose circular icons, all of uniform size 50 x 50 px.
4) Next you decide which all icons to group together into which all rows. Here, we will group the icons into three distinct rows. Select the first set of icons to be grouped together in the first row.
5) Right-click on the selection and choose Alignment > Align Middle.
6) The selected icons will now be aligned in the middle vertically, thereby forming the first row.
7) We repeat the same for the remaining icons to be grouped into the second and third rows.
8) We notice that the horizontal spacing between the icons in the rows are all uneven. To fix this, click Alignment on the toolbar and in the Align Horizontally field click the right-most setting Space Horizontally. It will auto-distribute the icons horizontally with equal spacing. But suppose you want to give your own custom horizontal spacing. For that purpose, uncheck Auto Distribute and enter the desired value in the box. Here, we have entered the custom spacing of 15px. Click Done.
9) Now we will group the icons in this row together. Right-click on the selection and select Group from the menu.
10) We do the same for the icons in the second and third rows. You can check the grouped icons in the Layers panel too.
11) We notice that the gaps between the three rows (of grouped icons) are uneven both horizontally and vertically. To fix this, click Alignment on the toolbar and in the Align Horizontally field, select the Align Left setting. This will align all the grouped rows left. Next we need to align the rows with equal spacing vertically. To achieve this, in the Align Vertically field click the Space Vertically setting. It will auto-distribute the rows vertically with equal spacing. To give our custom spacing of 15px as we did for the horizontal spacing, uncheck Auto Distribute and enter 15px in the field.
12) To save our sprite, choose File > Export... In the dialog box that popped up, the PNG tab will be open by default. Choose Selection without background in the Area field. Press Export.
The Image Sprite Created in Affinity Designer
Here is the CSS sprite we just created and exported.